Cams are the factors that distinguish compound bows from other types of bows, only this sentence can emphasize the importance of proper working of cams. Cam timing ensures that both cams reach their full draw positions simultaneously, optimizing energy transfer and enhancing shooting accuracy.
As an archer, knowing how to check and adjust cam timing is a vital skill. It prevents unexpected deviations and helps you troubleshoot any unexplained fliers during your shooting sessions.
I have designed this article in a beginner friendly way to make the beginners understand what are these terms, their causes and impacts easily. If you just want the instructions then go to the how to adjust the cam timing.
Understanding Cam Timing
Cam timing is a critical aspect of a compound bow’s performance. It refers to the synchronization of the cams during the draw cycle. The cams, located at the end of the bow’s limbs, control the energy storage and release as you draw and shoot the bow.
This synchronous movement distributes the force evenly throughout the draw cycle, resulting in a smooth and consistent draw. It also maximizes the energy transfer to the arrow, leading to increased arrow speed and improved shooting performance.

Causes of Cam Timing Issues
Several factors can lead to cam timing issues:
- String and Cable Stretch: Over time, the bowstring and cables can stretch, affecting the cam’s synchronization.
- Cam Bearing Wear: Worn or damaged cam bearings can lead to uneven cam movement and timing discrepancies.
- Bow Tuning Changes: Any changes in the bow’s setup, such as rest adjustments or nocking point changes, can impact cam timing.
Impact of Cam Timing Issues on Bow Performance
Cam timing issues can significantly affect the bow’s performance:
- Nocking Point Variation: Improper cam timing can lead to inconsistent placement of the nocking point, affecting arrow flight and accuracy.
- Inconsistent Draw Length: Cam timing problems can result in uneven draw lengths, leading to inconsistent shooting experiences.
- Reduced Energy Transfer: If cam timing is off, the energy transfer to the arrow may be inefficient, resulting in decreased arrow speed and reduced overall performance.
Understanding Cam Lean
Cam lean, also known as limb or axle lean, refers to the lateral position of the cams concerning the bow’s riser. During the draw cycle, the cams should remain perfectly aligned with the bow’s limbs and riser to ensure even and symmetrical forces are applied to the limbs.
Cam lean can occur when one cam is higher or lower than the other, which can lead to uneven limb deflection and unequal force distribution. This imbalance can cause the bow to tilt to one side during the draw, affecting arrow flight and accuracy. Addressing cam lean is essential for achieving consistent and accurate shots.
Correcting cam lean involves aligning the cams with the bow’s limbs and riser to ensure a balanced draw cycle.
Causes of Cam Lean Issues
- Bow Setup: Improperly installed components, such as the bowstring, cables, or cams, can cause cam lean. It is essential to follow the manufacturer’s instructions during bow assembly.
- String and Cable Stretch: Over time, the bowstring and cables can stretch, leading to changes in cam alignment. Regular use and high draw weights can accelerate this process.
- Cam Bearing Wear: Worn or damaged cam bearings can cause the cams to tilt, resulting in cam lean.
Impact of Cam Lean on Bow Performance
Cam lean can significantly impact the performance of a compound bow. Some of the effects of cam lean include:
- Inconsistent Nocking Point: Cam lean can cause the nocking point to shift, resulting in inconsistent arrow placement and accuracy.
- Arrow Flight Deviation: Cam lean affects the synchronization of the cams, leading to uneven limb deflection during the draw cycle. This can cause arrows to veer off target and negatively impact accuracy.
- Limb Stress: Cam lean can cause uneven stress on the bow’s limbs, potentially leading to premature wear and decreased bow lifespan.
Components Involved in Cam Timing and Cam Lean
Understanding cam timing and cam lean requires familiarity with the key components involved in their operation. These components include:
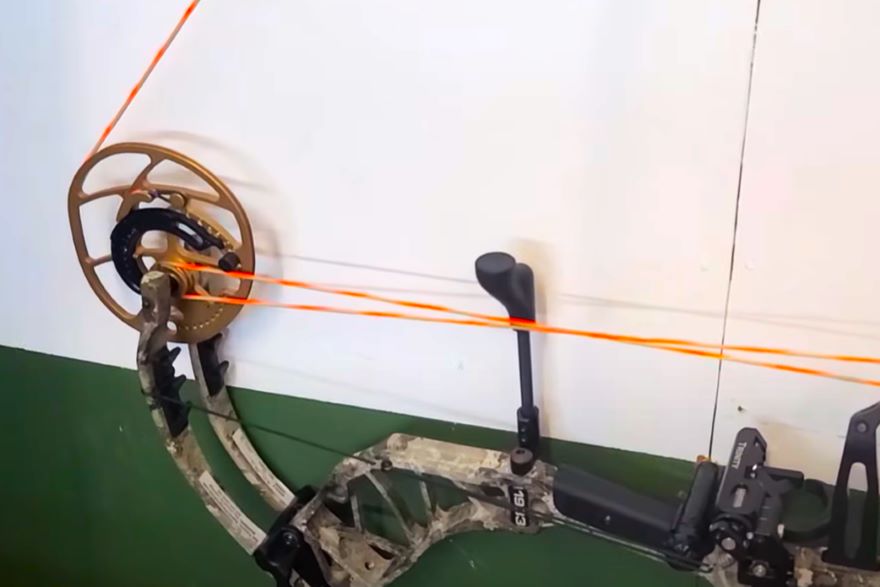
- Cams: The circular wheels attached to the end of the bow’s limbs. Cams are responsible for controlling the draw cycle and energy storage/release.
- Control Cables: These cables connect the cams to the bow’s riser and play a significant role in cam synchronization.
- Buss Cables: Buss cables also connect the cams to the bow’s riser and contribute to cam synchronization and balance.
- String: The central element that connects both cams and transfers energy to the arrow during the release.
How to Check Cam Timing on a Compound Bow
Testing cam timing is an essential part of bow maintenance. Follow these steps to test the cam timing of your compound bow:
- Use a Draw Board: Place your bow on a draw board to safely draw the bow consistently.
- Draw the Bow: Use the draw board to draw the bow to its full draw length. Observe the movement of each cam throughout the draw cycle.
- Check Synchronization: Pay close attention to both cams’ positions during the draw. They should reach their full draw positions simultaneously. If one cam reaches its peak before the other or if the draw feels uneven, there may be a timing issue.
- Timing Marks: Verify that the cams align with their timing marks. The timing marks indicate the correct alignment for proper cam timing.
Tools and Techniques for Accurate Testing
Accurate cam timing testing requires the use of specific tools and techniques:
- Bow Press: A bow press is essential for safely removing tension from your bow cables and strings.
- Draw Board: A draw board allows for controlled and consistent drawing of the bow, facilitating accurate cam timing assessment.
- Timing Wheel: A timing wheel is a specialized tool used to measure the exact position of the cams and ensure proper synchronization.
How to Adjust Cam Timing on Single Cam Bow
Solo cam bows operate with one cam on the bottom and an idler wheel on top. To achieve maximum performance, the cam must be properly set while the bow is in a static position. Follow these steps to adjust cam timing on Solo cam bows:
1. Identify Timing Marks:
Locate the timing marks on the cam and the corresponding string or cable. These marks indicate the proper alignment for optimal cam timing. These are different for different bows. But mostly there is a hole in the cam and when the cam is timed perfectly you can see the cable passing through the hole but perfectly centered.
2. Use a Bow Press:
Place your bow on a bow press to safely work on it. Relieve the tension on the bow by pressing it.
3. Adjust Cam Rotation:
With the bow in a pressed position, you can change the cam rotation by twisting or untwisting cable. This will affect the timing of the cam.
4. Check Synchronization:
Verify that the timing marks align properly. when everything is perfectly timed, the cable of the bow should be running through the center of the hole. This alignment indicates that the cam is synchronized correctly.
5. Make Fine Adjustments:
If necessary, repeat the process of pressing and adjusting until you achieve precise cam timing.

Adjusting Cam Timing on Dual Cam Bows
Dual cam bows usually have timing marks provided by the manufacturer to indicate the suggested static position. Proper timing ensures that the draw stops on both cams hit simultaneously during the draw cycle. Here’s how to adjust cam timing on dual cam bows:
1. Observe Cam Synchronization:
Check how well both cams work together during the draw cycle. If you have a draw board, its easy to see which cam hits the cable stop first. But if you don’t have a draw board then have a friend watch you draw the bow or use a draw board to inspect for timing issues.
2. Use a Bow Press:
If there are problems, place your bow inside a bow press to release the tension on the cables and bowstring.
3. Twist/Untwist Cables:
If one cam stops earlier than the other, add a few twists to the cable on the cam that reaches the draw stop earlier. Start with small increments, as they can have a significant impact. Twisting in one direction shortens the cable while twisting in the opposite direction lengthens it.

4. Reevaluate Synchronization:
Release the bow from the press and observe the cams during the draw process. If both cams do not hit the stops simultaneously, repeat the process of adding twists as needed.
5. Fine-Tune as Required:
Continue making adjustments until you achieve perfect synchronization of both cams.

Adjusting Cam Lean on a Compound Bow
Cam lean, the lateral misalignment of the cams concerning the bow’s riser, can be corrected to enhance bow performance.
1. Identify Cam Lean Issues:
Begin by inspecting the cams while drawing the bow. Look for any tilting or misalignment of the cams during the draw cycle. Cam lean issues may manifest as the bow tilting to one side during the draw or shot. Use a ruler and place it on the cam shaft and compare the angle with the bow string. If they are parallel then there is no issue but if there is an angle between them, it needs correction.
2. Use a Bow Press:
To adjust cam lean, place the bow on a bow press to safely release tension from the bowstring and cables. Working on the bow with the press ensures that it remains stable and secure during the adjustment process.
3. Cam Shim Adjustment:
Many modern bows come with cam shims that can be inserted between the cam and the limb to correct cam lean. By adding or removing shims, you can align the cams properly to eliminate any lateral tilting.
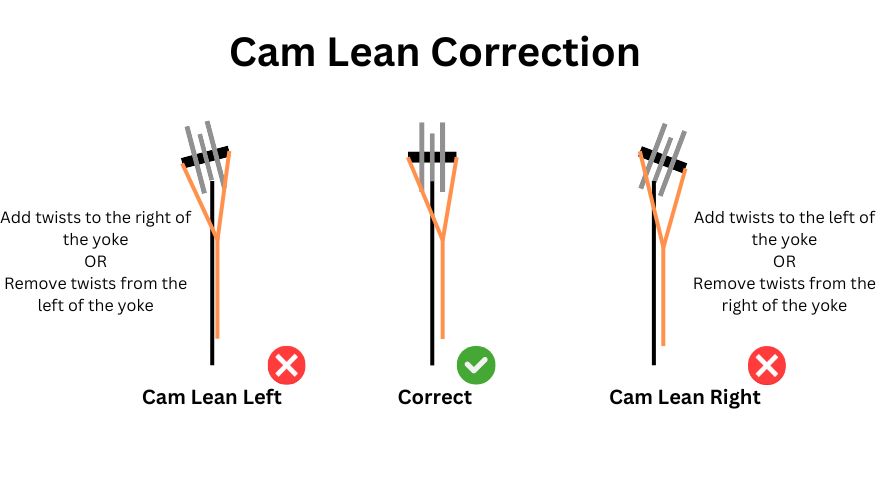
4. Yoke Harness Adjustment:
Check the positioning of the yoke harness, which connects to the ends of the split buss cables. The yoke harness plays a vital role in controlling cam rotation. Ensure that it is appropriately positioned on both sides, maintaining equal tension on the split buss cables by twisting or untwisting the sides of yoke.
5. Verify Cam Alignment:
After making adjustments to the cam shims and the yoke harness, carefully observe the cam’s alignment during the draw cycle. The cams should move in a synchronized and balanced manner, with no noticeable tilting. Proper cam alignment ensures even limb deflection and consistent arrow flight.
6. Fine-Tune as Needed:
If there are still signs of cam lean or if you encounter other performance issues, further fine-tuning may be necessary. Repeating the adjustment process or seeking professional assistance can help resolve persistent problems.
Cam Tuning: Fine-Tuning Your Compound Bow
Cam tuning is the process of refining your compound bow’s performance by achieving perfect synchronization and balance between the cams, cables, and strings.
Importance of Cam Tuning
Cam tuning is critical for archers looking to extract the best possible performance from their compound bows. When your bow is properly tuned, you’ll experience enhanced accuracy, consistent arrow flight, and reduced noise and vibration during the shot.
Factors to Consider in Cam Tuning Process
Several factors influence cam tuning, including:
- Draw Length: Ensure your draw length is correctly set for your shooting style and comfort.
- Draw Weight: Adjust the draw weight to a level that suits your strength and shooting needs.
- Arrow Spine: Select arrows with the appropriate spine rating for your bow’s draw weight and length.
- Bow Setup: Pay attention to other bow setup elements, such as peep sight alignment, rest placement, and nock point position.
Step-by-Step Guide to Cam Tuning
Adjust Cam Timing and Lean: Refer to the previous sections to adjust cam timing and cam lean as necessary.
Paper Tune Your Bow: Perform a paper tuning test to assess arrow flight and identify any inconsistencies. Adjust your rest and nocking point as needed to achieve perfect arrow flight through paper.
Walk-Back Tune: To validate your bow’s accuracy, perform a walk-back tune. Shoot arrows from various distances while maintaining a consistent aiming point to check for consistent groupings.
After timing your cam refer to the complete guide to tune a compound bow to ensure performance and tune other parts.
Troubleshooting Cam Timing Issues
Despite your best efforts in adjusting and tuning your bow, cam timing issues can occasionally arise. Recognizing and addressing these problems promptly can save you from frustration and improve your shooting experience. Let’s explore how to troubleshoot common cam timing issues:
Identifying Bow Cam Timing Off Symptoms
- High or Low Nock Travel: If you notice that the arrow’s nock travels significantly higher or lower during the shot, it may indicate cam timing problems. This issue can result from uneven cam synchronization or cam lean.
- Inconsistent Nocking Point: If the nocking point on the string varies with each shot, it suggests cam timing or cam lean discrepancies.
- Cam Lean Issues: If your bow tilts to one side during the draw or shot, cam lean may be the culprit.
Expert Tips for Bow Cam Timing
To maintain your bow’s cam timing and optimize its performance, consider the following expert tips:
Regularly check your bow’s cam timing and perform routine maintenance. Keep the cams, cables, and strings well-lubricated to ensure smooth operation.
Invest in high-quality tools like bow squares, draw boards, and bow presses to aid in accurate cam timing adjustments. Quality tools contribute to more precise tuning.
Make cam timing checks a part of your regular bow maintenance routine. Addressing small issues early can prevent more significant problems and ensure consistent shooting.
FAQs on Cam Timing:
1. What is cam timing on a bow?
Cam timing on a bow refers to the synchronization of the cams during the draw cycle. Proper cam timing ensures that both cams reach their full draw positions simultaneously, maximizing energy transfer and improving shooting performance.
2. How do you adjust cam timing on archery?
By twisting or untwisting the bowstring and/or cables, you can change the cam rotation, affecting the timing. Regularly testing and fine-tuning cam timing is essential for consistent and accurate shooting.
3. How do I know if my bow timing is off?
You can identify if your bow timing is off by observing certain symptoms. Common signs of cam timing issues include uneven draw lengths, inconsistent arrow flight, and reduced shooting comfort. Additionally, if the cams do not reach their full draw positions simultaneously or if the timing marks are misaligned, it may indicate timing problems.
4. What does timing a bow mean?
Timing a bow refers to ensuring proper synchronization of the cams during the draw cycle. When a bow is timed correctly, both cams reach their full draw positions together.
5. Why is cam timing important in archery?
Cam timing is crucial in archery because it directly affects the bow’s performance and shooting accuracy. Properly timed cams ensure smooth and consistent draw cycles, providing a balanced limb force and minimizing any inconsistencies during the shot.
Conclusion
In conclusion, understanding bow cam timing is crucial for any archer seeking optimal performance from their compound bow. Properly adjusting and fine-tuning cam timing and cam lean lead to increased accuracy, consistent arrow flight, and a more enjoyable shooting experience.
By following the step-by-step instructions for cam timing adjustment and cam tuning, you can achieve better results in your archery pursuits. Regularly inspecting your bow’s cam timing and promptly addressing any issues will keep your bow in top shape.