
All string silencers have a different way of installation. Some might require a thread and others would need to be tied around the bowstring. I have compiled the tutorials of some of the most popular and widely used string silencers for compound bows. Look through the table of contents to find your desired string silencer setup guide.
Before moving on to installing, I would suggest you know where to install the silencer and what are the basics of silencer placement.
How To Install Cat Whiskers Silencers
The most popular silencers, cat whiskers, are used by most compound and traditional archers to silence their bow. The cat whiskers are said to be the most effective and efficient. This is because they can reduce noise effectively with little effect on the arrow speed.
These things are also a bit different to install as compared to other rubber silencers used on compound bows. It is because of the thread we need to tie. I will guide you with the installation.
- Cut your cat whiskers strip into two pieces with a length of about 1 inch and a quarter or 1 inch and a half each. Then place one strip on the other.
- Put them on the string from one side and roll it completely on the string. Don’t try to force it too tight. Just let it be loose. The two strips might be a bit separated when rolled around the string as one might be ahead of the other. It is normal.
- Now use a clothespin or a plier and pinch the rolled whisker strips so they stay in place.
- Here comes the most important part, tying the cat whisker. Take a serving string about 0.018 to 0.021 inches in thickness. I like to use a 0.021-diameter thread. You can use other types of threads as well but, be mindful that it is not sharp to cut the silencer strip.
- Make a constructor knot on the string then tighten it a bit on the center of the rolled strip. Don’t tighten it too much. First, adjust the roll by moving it up or down in the correct position then you can start tightening it as much as you can.
- After tightening, make a half knot like the one you make first while tying your shoe laces.
- Trim the excess string to a quarter inch. Then take a lighter and melt down the extra serving. Be careful in this step.
- Now for the last step, I just pull each strand on the strip. If they do not get separated then use a scissor to cut the very very little edge so the strands get separated and your cat whisker gets in a beautiful ball shape.
- Make sure all the strands are separated.
The video tutorial is a great resource to get your whisker silencer set up in a couple of minutes.
How To Install Pine Ridge Wishbone
Okay, so these things are pretty flexible and really a great choice. Let’s get started with the installation process for wishbone silencers.
- First place your bow on a table then place the string on the neck of the wishbone silencer. The neck is the region between the hole and the collar.
- Then grab its legs and try to move them through the hole. This will capture your string in the silencer. It might be a bit difficult to get the legs through the holes, at least it was for me but, you will do it.
- After the legs are through the hole, you need to pull the legs with all of your energy so that the collar can also pass through the hole. You can use your hand or even do this with a plier.
- Now that the collar is on the opposite side of the hole, the Pine Ridge Wishbone silencer is securely in place.
This video is a great tutorial to quickly install the Wishbone silencer. It took me less than 5 minutes to place 4 of them on the string and cables.
How to install Monkey tails
Monkey tails are a great option in rubber silencers. These are built specially for the Mathews and are preinstalled on them like on my bow. The installation process is the same as for pine ridge wishbone silencers. I will guide you a little through the process.
- Monkey tails have a hole, a collar or some call it a flare, and a tail.
- Similarly to the wishbone, place it on the table, and the marked bowstring between the hole and the collar.
- Then grab the tail and move it to the other side of the hole.
- Now pull the tail until the collar or flare passes through the hole. If you are using a plier be careful that it is not sharp to damage the silencer.
Test the monkey tail’s position by taking shots. You can easily move it up and down on the bowstring by applying some force.
How To Install Apex Double Down
The double down is also a rubber silencer and is extremely easy to install. I will get you up and running with the process.
- The double-down has a hole, a collar, and two ball tails.
- Place your desired point of the string between the collar and the hole.
- Then hold one ball tail, on the side of the hole, and push the other ball tail into the hole with the other hand. This might be a bit difficult trying with the hands so, do as the video tutorial says. Trap the ball tail in the nock of the arrow and push this set into the hole.
- After the ball tail is through the hole, remove the arrow nock. Now you can use your hand or plier to pull this ball tail. The goal is simple, to pass the collar through the hole.
- So with the collar in the hole, the Double Down silencer is now in place for silent shooting.
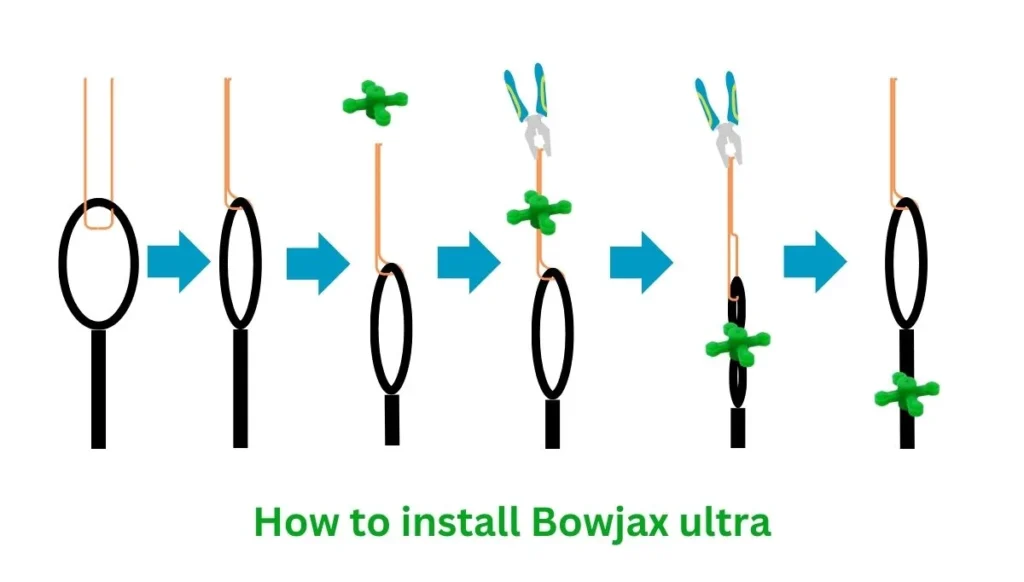
How To Install Bow Jax Ultra Silencers
The Bowjax string silencers, not very popular but still often used by archers are popular because of their unique way of installation. Also, they are claimed to be long-lasting.
The installation process is different because they do not need to be tied around the string or on the string by a serving thread. They are slid onto the string. Here is the process.
- First, unstring your bow. Take a piece of wire, preferably a copper wire. It should be small enough to fit into the silencer when doubled. Chain the wire in the loop of the string. This creates a U shape with the wire.
- Pull the ends of the wire closer to each other and pass them through the Bowjax silencer. Then have someone grip the ends of the wire with a plier. You can also use a bench press.
- Pull the Bowjax Ultra down so that it crosses the string’s loop. Now the hard part is almost over.
- You can now remove the wire and hold the loop in your hand. Pull down the silencer to your desired string location and you are all done. You can similarly place more Bowjax silencers on the string.
- After this restring your compound bow and get ready for some quiet action.
FAQs
Where do you put compound bow string silencers?
Compound bow string silencers work best when placed 3” or 4” away from the cams. They can also be placed at ⅓ or ¼ length of the string that can vibrate. Silencers on the cables are placed just after the serving or near the yoke’s joint. Learn more about the placement.
Do I have to unstring the bow to install silencers?
No, there is no need to unstring the compound bow to install most of the silencers except for the Bowjax Ultras. These ones need to be slid onto the bowstring by removing it from the cams.
Conclusion
I tried my best to help you with your silencer installation. The videos I have referred to you are the best and easiest ones. I hope you find them as informative as I did. Also, I tried to explain all the steps to you in this article. I wish you all the best in installing your string silencer and silencing your beloved bow.