
Installing a bow sight on a compound is a fairly simple task that you can perform yourself in no time. Don’t worry, you won’t need any experience to do this.
The riser of most bows has predrilled holes in which you can easily mount your sight. All you gotta do is find those, place the sight over them, and then tighten them, but you would also need to make some adjustments like the bowstring and pins adjustment and the arrow shaft alignment with the pins.
This article is a step-by-step guide to installing the bow sight quickly.
How to Install Bow Sight (Step-By-Step)
Without wasting any time take out your sight from the box and let’s get started with the process.
1. Gather Your Tools
Before you begin, ensure you have the necessary tools. You’ll need a sight, an Allen wrench set, and your bow. Some bow sights come with specific installation tools, so check the package contents before starting.
2. Understand Your Sight Type
Sights come in various types, including single-pin and multi-pin. Each type has unique features. Familiarize yourself with your sight’s components and how they function. This knowledge will make the installation process smoother.
3. Positioning the Sight On The Bow
Start by attaching the bow sight to the riser of your bow. It should be on the same side as the arrow rest. Align the mounting holes with the threaded holes on the riser. You’ll find that it’s secured with just two bolts. Insert the screws provided with your sighting equipment and tighten them using an Allen wrench. However, don’t fully tighten them yet, as you may need to adjust the sight’s position later.

4. Optimizing Pin Gap
Here’s where we add some valuable insight. The farther the sight is positioned in front of the bow, the wider the pin gap becomes. The pin gap is the space between the sight pins on your bow sight. The interesting concept here is that the farther you position your sight in front of your bow, the wider this pin gap becomes.
Now, you might wonder why you’d want a wider pin gap. Well, it’s all about accuracy. When your peep and front sight are set farther apart, you essentially have two reference points to aim with, making your shots more precise. So, let’s maximize your accuracy.
5. Quiver Attachment
The two threaded bolts holding your sight in place can also be used to attach your quiver. However, there’s a crucial consideration here. You’re putting steel screws into an aluminum housing on the sight. To ensure these screws remain easy to adjust and don’t seize up over time, apply a thin layer of wax before fastening them. The wax acts as a lubricant and prevents the steel from binding with aluminum.
6. Fine-Tuning Your Sighting
With your sight securely in place, we’ll now perform what’s known as “bore sighting.” This ensures that it is initially aligned with your arrow, saving you time and arrows during the fine-tuning process.
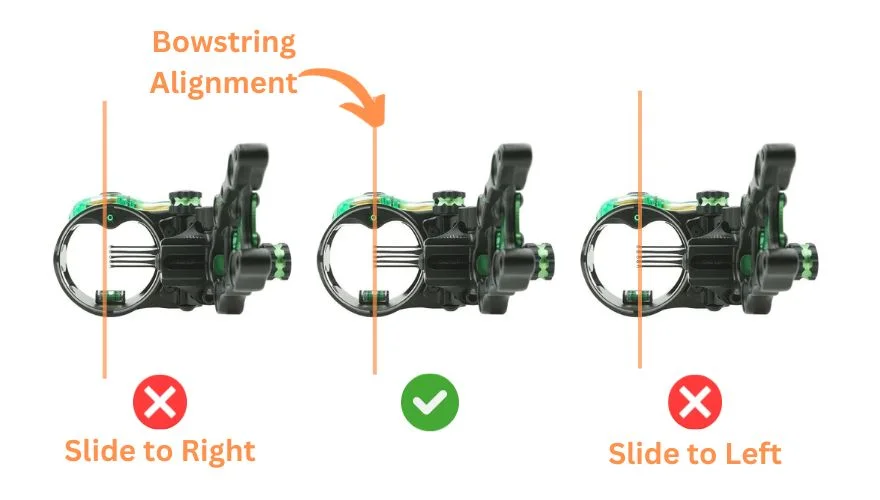
Bowstring Alignment: Start by setting your center shot, a fundamental alignment adjustment ensuring the arrow’s path aligns with the bowstring. Just look straight from the bowstring to make sure that it is perfectly aligned with the pins. If it is to the left or right, move the sight with its slider until it is level.
Arrow Alignment: Nock an arrow and tilt your bow forward a bit. Start looking down the length of your arrow shaft. Ideally, you want the pin or pins to appear as if it’s poised directly over the top of the arrow shaft. It’s important to be patient and make small adjustments by moving it with the slider each time to avoid overshooting the correct alignment.
By completing this bore sighting process, you’re essentially ensuring that when you head outside to shoot, you’ll be on target right from the start.
7. Final Steps
With your bow sight securely attached and bore-sighted, snugly tighten the bolts, but avoid over-tightening. Now it is time to make further adjustments as you fine-tune your sight. You will need to adjust windage, elevation, and second and third axes. Also, you will have to shoot at different distances and adjust your pins at different yards.
This basic 3-pin sight is a popular choice for many archers. It comes pre-set at fixed distances, often around 20, 30, and 40-yard pins, covering the majority of whitetail hunting scenarios. Here is how you can do it.
Pro Tips for Bow Sight Installation
Use a Leveling Tool: A leveling tool is essential for ensuring your sight is perfectly horizontal and vertical. It’s a small tool that makes a big difference.
Check for Proper Alignment: Regularly check your alignment. Even small shifts can significantly affect your accuracy. A quick check before each shooting session can save you a lot of frustration.
Use Thread locker: A thread locker is your defense against the vibrations that can loosen screws. A small dab on each screw will keep your sight secure.
Check Your Back Sight: Your back sight and bow sight should align perfectly. Adjust your peep(back) if they don’t align.
Regularly check the screws: Regularly check the screws to ensure that the sight is securely mounted to the riser.
Conclusion
Installing a bow sight may seem complex, but with patience and practice, you can do it yourself. Remember, the key to successful installation lies in understanding your bow sight and making precise adjustments. Once installed, it can significantly improve your accuracy, making archery more enjoyable and rewarding.