Adapting to your new hinge release might not be a fairly easy job but don’t worry I am here to simplify things up for you. There are some steps to follow in order to learn this skill and beat target panic.
Let me break these steps for you so you feel a bit easier, we are going to set the hinge release, and then we will start out the shooting process by learning how to draw with a back tension release, where should your fingers be, and, how your hand should be placed. Then we are gonna have a deep look at the two methods of shooting a back tension release. You will get to know about target panic in the end.
How to Set Up a Hinge Release
Alright, let’s dive into getting your hinge release all set up. It might sound a bit technical but don’t worry, I’ll break it down for you:
1. Adjust The Click Or Sensitivity Settings
Your hinge release has a tiny signal, like a “click,” that tells you it’s ready to go. You can control when this click happens. If you’re new to using the release, starting with the click can be helpful. It gives you a consistent starting point for your shot.
This click can be somehow helpful as it can make the archer ready for what is about to happen instead of shooting blindly. It’s more about personal preference because some archers might have anxiety or feel pressured because of this.
let’s break down the steps on how to adjust the hinge release for your preferred clicking or no-clicking setting:
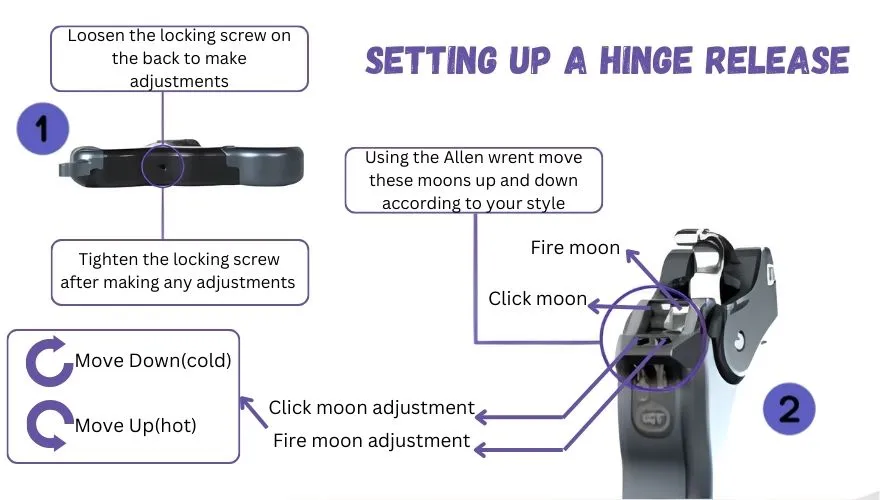
Step 1: Loosen the Set Screw
To begin adjusting the release, locate the set screw at the back of the hinge release. You should have received an Allen wrench with your release; use it to loosen the set screw by turning it a quarter turn counterclockwise.
Step 2: Initial Setup for Clicking
For the initial setup where you want the release to click, take the fire moon (a part of the release) as down as it can go using the Allen wrench. This means you push it all the way up against the wall or stop.
Step 3: Adjust the Click Moon
While safely blank baling (shooting at a target with no arrow), start adjusting the click moon to your desired location. The click moon determines when the release makes a clicking sound. This is the sensitivity of the trigger. If you set it too cold (down), then you will have to apply greater pressure to activate the trigger and hear a click sound.
If you are a beginner, try and set the click moon down so you will have to apply more pressure. This can help you with the premature release of the bowstring.
Step 4: Set the Firing Position
Next, adjust the fire moon to your desired firing position. This effectively determines the length of time from when the release clicks until the bowstring goes off. Try and keep it minimal so you don’t get too much tensed and the hinge release is about a surprise shot and getting rid of target panic. Keep the firing moon below the click moon or else you won’t hear a click.
Step 5: Making It No-Click
If you want to set the release to a no-click mode, you need to make the click moon colder than the fire moon. Here’s how:
- Move the click moon down (colder).
- Move the fire moon up (hotter).
By doing this, you disengage the fire moon and engage the no-click moon. After making any adjustments, remember to snugly tighten the set screw at the back of the release to secure your chosen settings.
2. Length Adjustment
Many hinge releases come with an adjustable mechanism usually a threaded rod or a sliding mechanism that allows archers to change the length to fit their hands better or to adjust the position of the release for better shooting. This adjustment ensures a comfortable grip and proper alignment, allowing for more consistent shots.
Try switching between 2 or 3 fingers apart from the index finger and see which one is easy to control and shoot for you.
Getting Started With a Back Tension Release
Before beginning shooting the hinge release, consider some tips to help you get used to the release quickly.
Understand the Basics: Make sure to learn the working and release mechanism of the hinge release so you know what to expect. Look at user reviews before buying a hinge release. Also, try and hold one in your hand to know how many holding fingers feel comfortable.
Practice without Arrows: Before adding arrows, practice using the release without them. Get used to its feel and movement.
Learn the Feeling: Pull the release and notice when your muscles relax. This is when it works. It’s like winding up a spring and then letting go.
Add Arrows Slowly: When you’re comfortable, add arrows. Focus on how you release, not the target.
Using a back tension release might be new, but with practice, you’ll shoot more accurately.
How to Shoot Hinge Release
Shooting with a hinge release may seem complex, but it’s all about finesse and control. Here’s your guide:
1. Hold the Release Securely
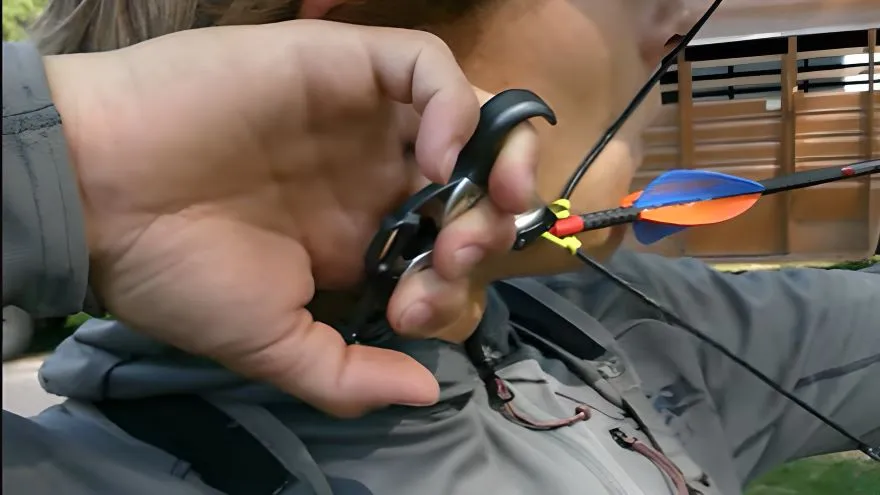
Grip the hinge release in your hand with your fingers gently curving around the hinge. Think of making a fist but without squeezing the hinge too tightly. Make sure your hand is straight and the handle and head is in the second knuckle of the fingers. Also, the thumb should be on the thumb rest.
2. Draw the Bowstring:
Draw the bowstring keeping 70 percent of the force on the thumb and pointing finger(the one on the head). When the bowstring is fully drawn remove the thumb from the thumb rest and relax your thumb and pinky finger. Don’t exert much pressure on the other fingers or it might activate prematurely. If you are using a release with a safety button, hold the button until you are ready to shoot. Keep your focus on your back muscles accumulating back tension.
3. Two Methods to fire the release
When it comes to shooting with a hinge release, there are two cool methods. Let’s explore them step by step:
1. Back Tension Method
In this method you will be primarily focusing on your back muscles and when they reach the point where all the back tension is stored. When you reach full draw and your threshold back tension, your hand will automatically rest and slowly get off the release. In between this when the hand is slowly losing grip of the release the pointing finger will naturally rotate the head a bit. This rotation will activate the release mechanism and will fire the arrow. This feels like a surprise release but the result is very consistent. Your release will offer a click just before shooting so you know what’s about to happen.
2. Manual Rotation Method
In the manual rotation method, after you pull the bowstring, you shift the pressure from your pointing finger to the middle and ring finger and push the handle. This rotates the release and activates the mechanism. After a bit, you hear the click followed by a shot.
Which Method Should You Choose
I prefer the first method because it is more natural and consistent. The manual method causes a lot of pressure in your tendons and ultimately in your forearm. This causes loss of form and shivering of arms when shooting. Also results in causing target panic and dumping your hinge.
In the first method, all the fingers are relaxed and the shot is more controlled and accurate. Both ways are like different paths to the same goal: shooting that target spot-on. So, give them a try and find the way that works best with your style.
4. Relax the Back of Your Hand
Throughout the entire shot process, ensure that the back of your hand remains relaxed. This contributes to a smooth and controlled release.
5. Release with Precision
As you focus on your target, maintain the relaxation in your hand, allowing the release to glide through your fingers. The release will activate upon contact, leading to the arrow’s smooth release. Make sure to follow through, slowly moving your hand to the shoulder after release. Keeping everything in a straight line.
Can a Back Tension Release be Used for Hunting?
Hunting in the woods involves both skill and preparation. You can use a back tension release to help you shoot accurately. But there are essential things to think about.
Hunting is different though. Animals move around, and you might need to shoot quickly. This is where using a back tension release can be a bit tricky. It needs careful timing, which might not always match the fast pace of hunting.
Hinge Releases might not be the perfect fit for hunting and you should look for something that is a bit quicker to shoot and gives you more control over when to shoot. There are releases that let you shoot faster like the wrist strap finger release that offers a trigger or a better option can be a thumb release. These might be better for hunting. They’re designed for quick shots, which can be important when animals move suddenly.

How To Overcome Target Panic with Hinge Release?
Tackling target panic might sound like a puzzle, but using a back tension release can be your secret weapon. Let’s break it down:
What’s Target Panic?
Imagine trying to hit a target, but your nerves mess up your aim. That’s target panic – when you’re so anxious about hitting the mark that your shot goes off before you’re ready.
How Back Tension Helps?
Using a back tension release is like having a calming friend. When you draw the bowstring, you’re building up tension. With back tension, you release that tension smoothly and surprise-free. This stops you from jerking the shot and helps beat target panic.
The Back Tension Process
As you draw, you build up energy like winding the clock’s spring. With back tension, you reach a point where your hand naturally lets go, just like the spring releasing energy. This helps you to get rid of trigger anxiety and premature shooting. Your shot will be timed correctly.
Why Does It Work?
Back tension gives your brain less time to panic. Since the release triggers naturally, you don’t rush it. This helps retrain your brain to stay calm, making target panic a thing of the past.
Practicing with Back Tension
Using a back tension release might feel strange at first, but practice makes it perfect. Start slow, get used to the feeling, and watch how your shots become steadier. Over time, your accuracy will improve.
The Magic of Back Tension
In a nutshell, back tension releases are like your secret weapon against target panic. They help you stay calm, release smoothly, and hit your target like a pro. Give it a shot – you’ll be surprised how much calmer and more accurate your archery becomes!
Frequently Asked Questions (FAQ)
Why shoot a back tension release?
Using a back tension release offers smoother and more controlled arrow releases, enhancing shooting accuracy. It helps eliminate jerky movements associated with traditional trigger releases and can aid in overcoming target panic.
How does a back tension release work?
A back tension release employs controlled muscle tension and rotational mechanics. By using your back muscles to build tension while aiming, the release is activated when the tension reaches a specific point, resulting in a seamless arrow release.
Are back tension releases more accurate?
Yes, back tension releases are known for their accuracy-enhancing qualities. They promote steadier shots by minimizing abrupt trigger actions, which can lead to more consistent and precise shooting results over time.
What is a hinge-style release?
A hinge-style release, also known as a back tension release, is an archery tool that relies on controlled muscle tension and rotational movement to release the arrow. It operates on the principle of building tension through back muscles, leading to a smooth and surprise-free release.
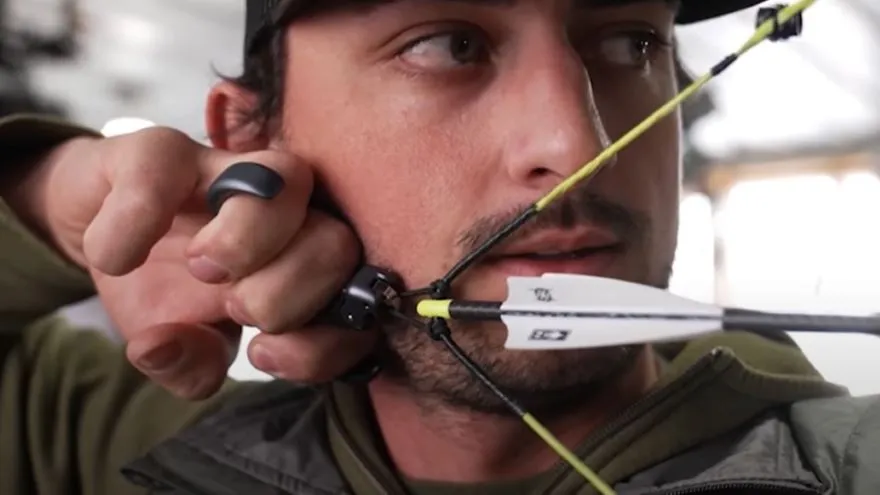
How do you anchor a hinge release?
To anchor a hinge release, draw the bowstring while maintaining focus on your back muscles. Anchor the bowstring to a consistent point on your face, such as your chin or cheek. This helps ensure a consistent shooting form and aids in maintaining accuracy.
Final Thoughts
The handle, head, and hook work in harmony to ensure a controlled and surprise-free release of the arrow. Whether you call it “back tension” or “hinge,” the essence remains the same – using your back muscles and controlled movement to achieve precision. This tool can help a lot in solving problems like rushing the shot or jerking when shooting. Overcoming target panic becomes achievable with consistent practice, and the choice between methods adds a layer of personal preference. If you are interested in knowing more about the mechanics of a hinge or back tension release, feel free to follow this guide.