Switching from a traditional wrist strap, index finger release to a thumb release? Many Archers decide to take this step after a while. If you are looking for the all-in-one spot information for thumb release you are at the right place.
We will cover every aspect of thumb release from the definition, benefits, and selection to how to properly shoot it. Go ahead and read from the beginning with us or choose your desired section.
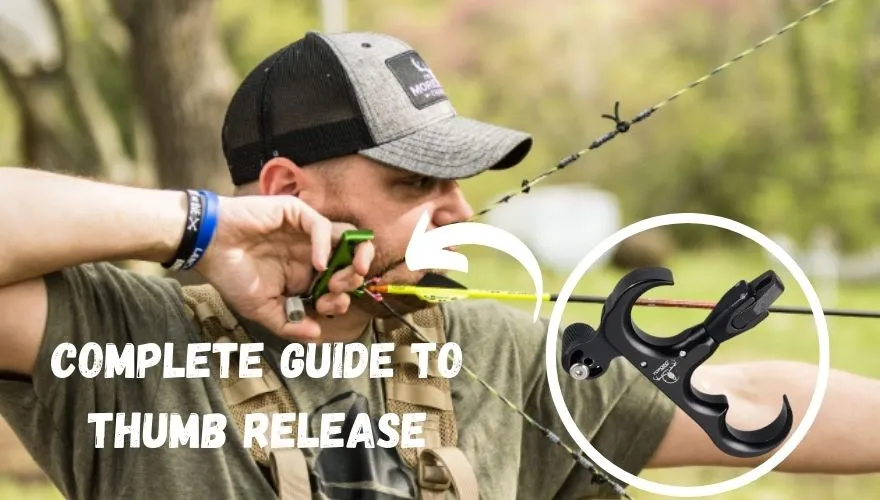
What is a Thumb Release?
A thumb release is an accessory used in archery to release the bowstring and shoot an arrow. Instead of using your fingers to release the string, a thumb release attaches to the string and is triggered by your thumb’s movement. It offers more precision, control, and consistency in your shots. This type of release aids accuracy and can be especially beneficial for those seeking to improve their archery skills.
Why Use a Thumb Release?
Transitioning to a thumb release in archery offers a range of advantages that significantly enhance accuracy and shooting consistency. Here’s a closer look at the benefits and considerations.
Advantages:
- Accuracy: Thumb releases offer enhanced accuracy due to their consistent and controlled release mechanism.
- Consistency: Thumb releases promote a more repeatable shooting form, leading to consistent arrow flight and groupings.
- Bowstring Clearance: Thumb releases often provide better clearance for the bowstring upon release, reducing interference and improving accuracy.
- Less String Torque: Thumb releases tend to produce less torque on the bowstring during release, reducing arrow deviation.
- Reduced Finger Stress: Using a thumb release can help prevent finger fatigue and string pinch that might occur with finger releases.
Disadvantages:
- Learning Curve: Switching to a thumb release can take time to master, requiring practice and adjustment.
- Initial Cost: Quality thumb releases can be pricier than basic finger tabs or releases.
- Equipment Adjustment: Using a thumb release might require slight adjustments to your bow setup like peep sight and draw length settings.
- Personal Preference: While advantageous, some archers might still prefer traditional finger releases.
How to Choose Your Thumb Release
When you’re ready to step into the world of thumb releases, there are a few important factors to consider before making your purchase.
1. Release Size
Choosing the correct size for your thumb release is essential for a comfortable and effective shooting experience. A release that’s too small can cause discomfort and hinder your control, while a release that’s too large might lead to inconsistency. To determine the right size, consider the following:
- Fit: Try different sizes to see how they feel in your hand. The release should snugly fit your thumb without causing discomfort.
- Adjustability: Some thumb releases offer adjustable components, allowing you to fine-tune the fit for your thumb.
2. Release Design
Thumb releases come in various designs, each catering to different shooting styles and preferences. Here are some common designs and their implications:
- Hook vs. Capilar jaw: Hook jaw releases have one hook that holds the D loop, while Capilar jaw releases trap the D loop inside of them. Capilar jaw releases might offer more security, while hook releases can be quicker to attach.
- Back Tension vs. Trigger: Thumb releases can be either back tension (activated by pressure) or trigger-style (activated by squeezing the trigger). Choose the one that feels more natural and comfortable for you.
- Ergonomics: Consider the grip and ergonomics of the release. Some designs might offer more surface area for your thumb, providing a steadier hold.
3. Release Features
Understanding the features of different thumb releases can help you make an informed decision. Some features to look out for include:
- Adjustable Trigger: Certain releases allow you to adjust the sensitivity and travel of the trigger, tailoring it to your preferences.
- Swivel Head: A swiveling head can enhance your range of motion and reduce torque on the bowstring during release.
How to Set Up The Thumb Release
Getting your thumb release ready for shooting involves a few important steps:

1. Trigger Placement
Positioning the trigger correctly is crucial for comfortable shooting. Follow these steps:
- Hold the release naturally in your hand, ensuring a comfortable grip.
- Position the trigger so it aligns on the line between two pads of your thumb (known as IPJC).
- The trigger should be accessible without straining your thumb’s movement.
- If it is not, then locate the adjustment screw and move the trigger accordingly.
2. Trigger Sensitivity
Adjusting the trigger sensitivity allows you to customize the release’s response to your preference:
- Locate the trigger adjustment feature, often a screw or mechanism near the trigger.
- Turn the screw clockwise to increase sensitivity (requires less pressure) or counterclockwise to decrease sensitivity (requires more pressure).
- Experiment with adjustments until you find the setting that suits your shooting style.
By properly placing the trigger and fine-tuning its sensitivity, you’ll enhance your control while shooting with a thumb release.
How to Shoot a Thumb Release
Here’s a detailed guide on effectively shooting with a thumb release:
1. Holding the Release
Hold the thumb release in your hand with a relaxed yet secure grip. Place the release on the line between the knuckles of your thumb, not making a fist. Keep your hand straight or it might cause strain in your wrist. Ensure the release is not in the edges of your fingers which can lead to stress in the fingers and potential inconsistencies in form. Keep all the fingers relaxed.
2. Anchoring with the Release
As you draw the bowstring with a thumb release in hand, the conventional index-finger anchor point evolves. Instead, focus on a distinct anchor point – positioning your jaw between your index and middle finger. Position your thumb release hand so that your thumb’s knuckle rests against your trigger, with your jaw placed between your index and middle fingers. This shift establishes a consistent reference, aligning your body, equipment, and target.
This unconventional anchor not only harmonizes with the mechanics of the thumb release but also guides your draw length, release point, and shot execution. Try this new anchor a few times and try to adjust your bow accordingly. Adjust your sight, peep sight, and drawlength that is right for you. The new anchor will most probably make you feel a little strange about the drawlength. Adjust it by making it longer or shorter.

3. Position Your Thumb
Prepare your thumb for a controlled shot. Place your thumb on the release’s trigger or activation mechanism. Avoid using just the tip of your thumb for a controlled shot. Allow the natural movement of your thumb to activate the release.
4. Adjusting Rocker Position
Rocker positioning in thumb releases refers to the adjustment of the pressure distribution applied by your fingers on the release aid. The term “rocker” refers to the pivoting motion of the release when pressure is applied. Check pressure distribution between your index and middle finger. Adjust the pressure so that it is evenly distributed so your shots are consistent.
5. Shooting With The Release
Mastering how to smoothly activate a thumb release is pivotal for precision. Here are the techniques you can explore:
Back Tension Method:
- Begin by curling your thumb around the thumb barrel of the release.
- As you draw the bowstring, ensure your hand remains relaxed, and avoid jerking or tensing your thumb.
- Maintain your established anchor point, focusing on using back tension instead of pulling the trigger abruptly.
- Gradually apply subtle pressure to the trigger while simultaneously focusing on the tension in your back muscles.
- This way by applying back tension, your back blades will squeeze and your arm will automatically continue to go back.
- Continue the pull with your arm until you sense the release gently firing.
- By emphasizing back tension, you’re promoting a gradual and controlled release, free from jerky trigger pulls.
- Throughout the shot sequence, keep your target alignment steady and maintain a focused and deliberate pull.
Thumb Lock and Relax:
- Securely lock your thumb onto the barrel of the trigger at full draw.
- As you execute this method, your thumb acts as an anchor point for the release.
- Gradually relax your hand while maintaining the thumb lock.
- Let your fingers naturally slip off the release as your hand relaxes.
- The bowstring’s forward movement, driven by the energy in the bow, will pull the release into your locked thumb, triggering the shot.
- This approach encourages a surprise release, eliminating any flinching or trigger-punching tendencies.
Each of these methods offers a unique approach to releasing the bowstring. Through dedicated practice, you’ll develop muscle memory and refine your technique. The goal is to achieve a smooth, controlled, and surprise-triggered shot, leading to heightened accuracy and consistent performance with your thumb release.
6. Practice
- Consistent practice is essential for improving your shooting skills with a thumb release.
- Focus on maintaining a steady grip, anchor point, and release pressure.
- Regular practice helps build muscle memory and increases accuracy over time.
Frequently Asked Questions (FAQ)
Q: Why use a thumb release?
Transitioning to a thumb release offers enhanced accuracy, consistency, and control in archery. The unique mechanics of a thumb release allow for a more controlled and gradual release of the bowstring, reducing torque and promoting a smoother shot. It’s an ideal choice for archers seeking precision and those looking to improve their overall shooting skills.
Q: Where do you anchor with a thumb release?
With a thumb release, the conventional anchor points differ from finger releases. Instead of anchoring your index finger on your face, focus on positioning your jaw between your index and middle finger. This unique anchor point ensures consistency in draw length, shot execution, and overall accuracy.
Q: Is it easier to draw with a thumb release?
Drawing with a thumb release can feel different initially, especially if you’re accustomed to finger releases. While it might take some adjustment, many archers find that the thumb release offers a smoother draw due to its controlled and gradual release mechanism. As you become familiar with the technique, drawing with a thumb release can feel comfortable and efficient.
Q: How do you hold a thumb button release?
Holding a thumb button release involves finding the balance between a relaxed grip and secure control. Position the release against the second knuckle of your thumb and avoid clenching it into a fist. Allow your thumb to curl around the release, with the release trigger aligned against the pad of your thumb. This position ensures a controlled press while maintaining flexibility for a smooth shot.
Conclusion
As any newly acquired gadget requires time and practice to master its skill, the same is the case with Thumb release. If you really think about it the pros of it outperform the cons. The thumb release is a very popular choice in archery. You should at least try it to get its full taste and if you want to permanently switch to it, take your time and practice as much as you can, and start hitting your targets.
Pingback: What is A Hinge (Back Tension) Release And Why You Need One
Pingback: How To Shoot A Hinge (Back Tension) Release: Complete Guide