For an archer, having precise equipment is crucial for achieving accurate shots. The whisker biscuit is a popular arrow rest choice for many archers due to its reliability and ease of use. In this comprehensive guide, we will walk you through the process of installing and tuning a whisker biscuit on your compound bow, ensuring optimal performance and accuracy.
Preparing for Installation
Gathering the Necessary Tools and Equipment
Here’s a list of tools and equipment you’ll need:
1. Allen Wrench: Many whisker biscuit models use Allen screws for mounting and adjustments. Having an appropriate-sized Allen wrench will make these tasks easier.
2. Whisker Biscuit: Ensure you have the correct size rest that matches your bow’s specifications. If you can’t figure out the right size for your bow, follow the instructions in the next section.
Choosing the Right Whisker Biscuit Size for Your Bow
Whisker biscuits come in various sizes to accommodate different arrow diameters and fletching configurations. Choosing the wrong size can result in arrow flight inconsistencies and diminished accuracy. Here’s how you can determine the right size for your bow:
1. Measure Your Arrow Diameter: Use a ruler to measure the diameter of your arrows. Write down the measurement.
2. Assess Fletching Configuration: Take note of your arrow’s fletching configuration, which includes the number of fletchings (feathers or vanes) and their placement (e.g., helical or straight).
3. Refer to the Manufacturer’s Chart: Whisker biscuit manufacturers usually provide sizing charts that correlate arrow diameter and fletching configuration with the appropriate biscuit size. Match your arrow measurements with the chart to find the best fit.
Before buying a whisker biscuit, make sure to study a chart like this from the manufacturer to see what sizes are better for which arrows.
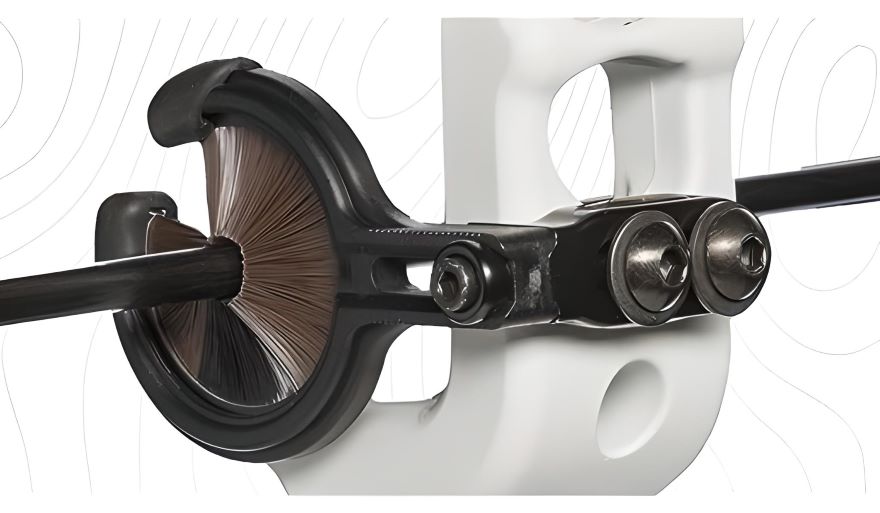
There are small, medium and large sizes for a specific size and below. Pick your size, and do make sure that the arrow has a space of 0.03″ between top of the arrow shaft and whiskers or bristles.
Step-by-Step Installation Process
Follow the step by step guide and you will be good to go in no time.
Step 1: Aligning the Whisker Biscuit
Proper alignment of the whisker biscuit is critical for consistent and accurate arrow flight. When the biscuit is not aligned correctly, it can cause arrow interference, resulting in erratic shots and reduced accuracy. Follow these tips for aligning the whisker biscuit accurately.

Visual Alignment: Hold the whisker biscuit against the bow riser and visually check if it’s parallel to the bowstring. Ensure that the bristles align with the string’s path, creating a straight and clear path for the arrow. The black bristles should be on the bottom of the rest. Most of the time the whisker biscuit is already perfectly aligned when taken out of the box, so you can start by installing it.
Use a Level (not necessary): A small bubble level can be placed on top of the whisker biscuit frame. Adjust the biscuit’s position until the level indicates that it’s perfectly perpendicular to the bowstring. This step ensures the most accurate alignment possible.
Step 2: Mounting the Whisker Biscuit
Positioning the Biscuit on the Bow Riser
Once the whisker biscuit is properly aligned, position it on the bow riser according to the manufacturer’s guidelines. The biscuit should be mounted close to the bow’s center, creating a balanced and stable setup.
- If you are right handed, align the arrow rest to the right of the bow riser.
- If you are left handed, align the arrow rest to the left of the bow riser.
Securing the Biscuit with Screws or Adhesive
Depending on the whisker biscuit model, it may require screws or adhesive for mounting. If screws are needed, insert them through the pre-drilled holes in the biscuit frame and into the corresponding holes on the bow riser. Use a screwdriver or Allen wrench to tighten the screws securely.
If the biscuit comes with adhesive backing, ensure the bow riser’s mounting area is clean and dry before attaching it. Peel off the adhesive backing and firmly press the biscuit onto the riser, applying even pressure to ensure a strong bond.
Step 3: Adjusting the Whisker Biscuit
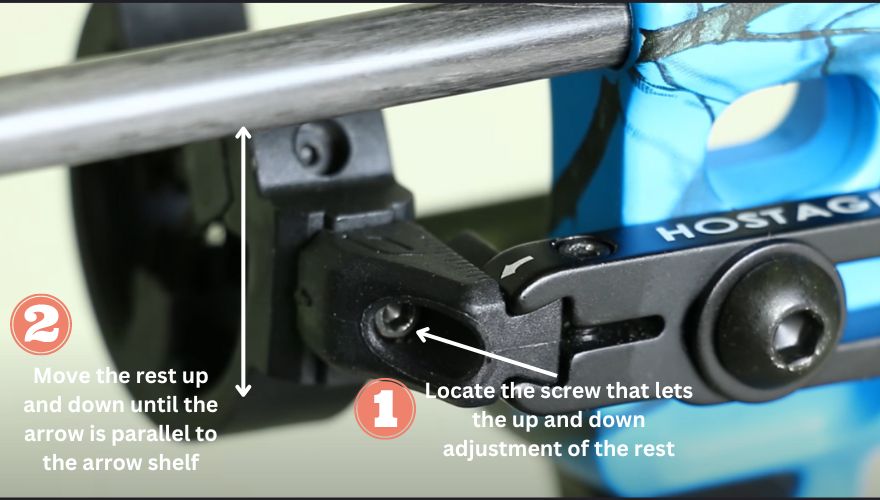
1. Achieving the Desired Arrow Height
The arrow height needs to be exactly equal to the nocking point. To achieve the correct arrow height, adjust the whisker biscuit’s position up or down on the riser. Visually look at the height of the arrow from the arrow shelf on the riser and ensure it is straight and parallel.
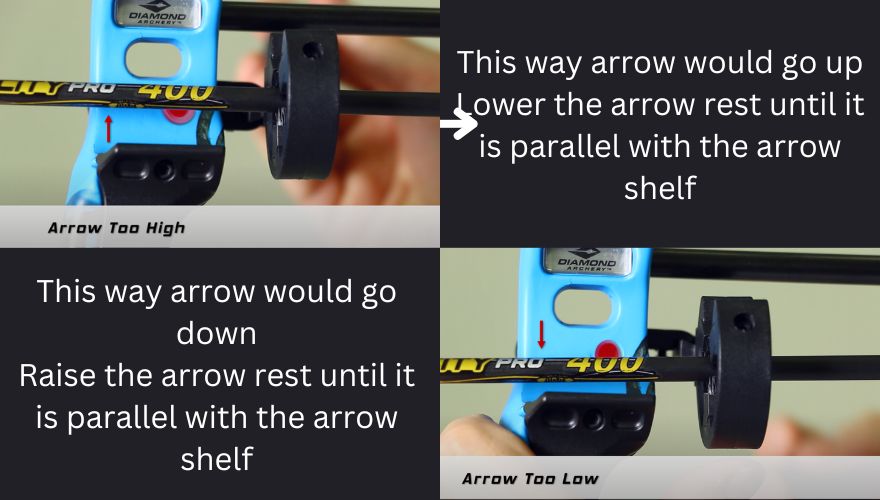
If its not straight your arrow can go up and down, so look for a small screw on the side of the riser, loosen it and move the biscuit up and down. Do this until the arrow is parallel to the arrow shelf. In the older models that are circular ring with bristles, there might be only one screw for both height and windage. Or its height could just be adjusted by loosening the mounting screws.
2. Ensuring Proper Windage
Now for your shots to go straight without deflecting left or right, you need to adjust the windage. One way is to measure the distance between the arrow shaft and front edge of the riser and compare it with the distance between back edge or riser and the shaft. If these distances are equal then your windage settings are good.

If they are not equal, look for the windage screw on the rest and move the biscuit left or right until those two distances are equal.

3. Fine-Tuning the Biscuit’s Position
After adjusting the arrow height and windage, test the bow’s performance with a few shots. Pay close attention to arrow flight and consistency. If needed, make minor adjustments to the biscuit’s position to achieve optimal performance and accuracy.
Tuning the whisker biscuit ensures maximum accuracy and consistency. Adjust the arrow rest position and test for consistent arrow flight. Make incremental adjustments as needed for optimal performance.
Paper Tuning a Bow with a Whisker Biscuit
Paper tuning is a crucial step in the process of fine-tuning your compound bow’s performance with a whisker biscuit.
1. Setting Up the Paper Tuning Station
To paper-tune your bow with a whisker biscuit, you’ll need a paper tuning station. Set up the station by attaching a large sheet of paper to a frame or target holder. The paper should be large enough to capture the arrow’s flight and leave a visible mark when shot.
Position the tuning station approximately 6-8 feet in front of your shooting position. Make sure the paper is level and perpendicular to your shooting line. The station should have adequate space to accommodate multiple shots without overlapping arrow holes.
2. Shooting Arrows Through the Paper
Stand at your shooting position and nock an arrow onto the bowstring. Draw the bow to your anchor point and aim at the center of the paper target. Release the arrow with a smooth and consistent motion.
As the arrow passes through the paper, it will leave a distinct tear pattern on the paper. Analyze the tear pattern to determine how the arrow is behaving during its flight:
- A clean, tear-shaped hole indicates a well-tuned bow with minimal horizontal and vertical movement during the shot.
- A horizontal tear suggests that the nocking point may need adjustment.
- A vertical tear indicates that the arrow rest or center shot alignment might require fine-tuning.
- A diagonal tear pattern suggests a combination of horizontal and vertical issues that need to be addressed.

3. Analyzing the Tear Patterns and Making Adjustments
Based on the tear patterns observed, you can make the following adjustments to improve your bow’s performance:
Horizontal Tear: If the tear is horizontal, adjust the rest left or right in small increments. Moving the nocking point to the right can help correct a left tear while moving it left can address a right tear.
Vertical Tear: A vertical tear requires adjustments to the arrow rest position. If the tear points upwards, move the arrow rest down, and if the tear points downwards, move the arrow rest up.
Diagonal Tear: A diagonal tear indicates a combination of issues. Address the horizontal tear first, followed by the vertical tear adjustments.
Make these adjustments in small increments, as drastic changes can affect the bow’s overall performance. After each adjustment, shoot additional arrows through the paper to observe the changes in tear patterns. Continue fine-tuning until you achieve clean, tear-shaped holes on the paper.
Tips for Using a Whisker Biscuit
Whisker biscuit is still a very popular option in archery. Check out the complete guide to find out the advantages of a whisker biscuit. Below are some tips for maximizing performance with a whisker biscuit.
1. Quality Arrows:
Invest in high-quality arrows that match your bow’s specifications and your shooting style. Properly matched arrows will contribute to improved accuracy and arrow grouping.
2. Regular Maintenance:
Perform regular maintenance on your whisker biscuit and bow. Keep the bristles clean and free from dirt or debris that could affect arrow flight. Check for any signs of wear and replace the biscuit if necessary.
3. Experiment with Different Arrow Configurations:
Try different arrow configurations, such as arrow weights, fletching styles, and broadhead types, to see how they affect arrow flight and accuracy with the whisker biscuit.
When To Replace the Whisker Biscuit?
Now that you know the installation process, understanding when to replace it is also important. Below I have given some reasons, when you need to change the whisker biscuit.
- Worn or Damaged Bristles: The bristles on a Whisker Biscuit can wear down or become damaged with use. If you notice frayed or broken bristles, it’s a sign that the biscuit is no longer providing proper arrow support. Replacing it at this stage is necessary to prevent arrow interference.
- Inconsistent Arrow Flight: If you experience a sudden decline in accuracy and consistency in your shots, it could be due to a worn-out or misaligned Whisker Biscuit. Even with proper adjustment, these components have a limited lifespan, and when they reach the end of their serviceability, they can negatively affect arrow flight.
- Cracked or Loose Frame: Inspect the frame of the Whisker Biscuit for any cracks or signs of loosening. Check the screws if they can hold the rest in its place and not change its alignment. In such cases, replacement is essential to ensure safe and reliable shooting.
FAQs
1. What is the proper Whisker Biscuit size?
Choose the Whisker Biscuit size based on your arrow diameter and fletching configuration, make sure the arrow has a space of 0.03″ from the top of the shaft and the bristles. Follow the manufacturer’s sizing chart for a proper fit.
2. Does Whisker Biscuits affect accuracy?
When installed and tuned correctly, Whisker Biscuits positively impact accuracy by providing reliable arrow support.
3. How should an arrow go through the Whisker Biscuit?
The arrow should pass smoothly through the bristles without resisting the fletchings, ensuring clean and consistent arrow flight. Make sure the odd colored fletching is facing straight up, so they fletching pass through soft bristles.
4. How do you attach Whisker Biscuits?
Attach the Whisker Biscuit using screws or adhesive, aligning it properly on the bow riser and fine-tuning the position for optimal performance.
Final Remarks
Congratulations! You’ve successfully installed and tuned your whisker biscuit, enhancing your archery experience. Embrace the benefits of using this reliable arrow rest, and remember to practice regularly to improve your skills further. With dedication and experimentation, you’ll achieve the precision and accuracy you desire in your archery journey.
Installing and tuning a whisker biscuit on your compound bow is a rewarding process that significantly enhances your archery performance. By following this guide, you’ve learned how to set up a whisker biscuit on a compound bow.